


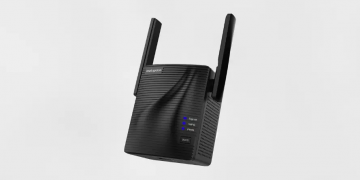


Having a stable and reliable Wi-Fi connection is essential in today’s world. Unfortunately, we often encounter the frustrating problem of poor Wi-Fi signals in certain areas of our homes or offices. Thankfully, a Rockspace WiFi extender setup can help to expand the reach of our Wi-Fi signal, ensuring a strong and steady connection wherever we go.
This article offers an easy-to-follow guide on how to set up your Rockspace WiFi extender. By following these steps, you’ll enjoy uninterrupted internet access throughout your home or office. Additionally, we’ll discuss the benefits of having a Rockspace WiFi extender and common issues that may arise during the setup process, as well as how to troubleshoot them.
Preparation
To ensure a smooth setup process for your Rockspace WiFi extender, it’s important to prepare a few items beforehand. Begin by checking your Wi-Fi connection to confirm that it is strong and stable. This will facilitate a simple and straightforward setup. Additionally, you’ll need a computer or mobile device connected to your Wi-Fi network to access the extender’s setup page.
To ensure that you have all the necessary equipment, carefully review the contents of the package that came with your Rockspace WiFi extender setup. This should include the extender itself, a power adapter, and an Ethernet cable.
Lastly, selecting an appropriate location for your extender during the preparation stage is crucial. Choose a spot where the extender can receive a robust Wi-Fi signal from your router and effectively extend the signal to the desired area for optimal performance and coverage. By following these preparation steps, you’ll be able to set up your Rockspace WiFi extender in no time!
Configuration
Once you’ve completed the setup of your Rockspace WiFi extender, it’s time to configure it. Follow these simple steps to get up and running quickly:
- Connect the extender to a power outlet and turn it on. Verify that the LED indicator lights are on, indicating that it’s operational.
- Join the extender’s network using your computer or mobile device’s Wi-Fi settings. Connect to the network with a name like “Rockspace Ext.”
- Open a web browser and enter the IP address for the Rockspace extender’s configuration page. You can typically find this in the user guide or by contacting Rockspace support.
- Log in using the default credentials, which are often “admin” for both the username and password. If these credentials don’t work, refer to the user guide or contact Rockspace support.
- Once you’re logged in, you can begin setting up the extender. Select your Wi-Fi network, enter your network password, and customise additional settings such as the network name (SSID) and password for the extender.
- After you’ve finished customising the extender, make sure to save and apply the settings. It will restart and join your Wi-Fi network.
- Move the extender to its final location, ensuring that it’s placed where it can successfully extend the Wi-Fi signal to the desired area. Verify the connection to confirm that the Wi-Fi signal is strong and reliable.
Your Rockspace WiFi extender setup will be successfully configured and available for usage if you follow these simple instructions.
Troubleshooting
Setting up your Rockspace WiFi extender can sometimes lead to problems, even with careful planning and configuration. Below are some common issues and their solutions:
- Unable to access the extender’s setup page: Ensure that you are connected to the Rockspace extender’s network and that you have entered the correct IP address in your web browser. Additionally, check that your computer or mobile device is not restricting access to the page.
- Unable to connect to your WiFi network: Double-check your network name (SSID) and password entries if you’re having difficulty connecting to your Wi-Fi network. Also, confirm that your router is powered on and emitting a signal.
- Weak Wi-Fi signal: If you’re still experiencing weak Wi-Fi signal after setting up the extender, try moving it to a different location. Make sure there are no physical obstructions, such as metal items or walls, blocking the Wi-Fi signal.
- Extender not turning on: Verify that the power outlet is functioning properly if the extender is not turning on. Attempt using a different power adapter or plugging the extender into a different outlet.
- Extender not extending the Wi-Fi signal: Confirm that the extender is placed in an area where it can receive a strong Wi-Fi signal from your router. Additionally, ensure that the extender is set up correctly and connected to your Wi-Fi network.
If you’ve tried troubleshooting and are still experiencing issues with your Rockspace WiFi extender setup, refer to the user manual or contact Rockspace support for further assistance.
Conclusion:
If the Wi-Fi signal in your home or place of business is weak, you can quickly increase it by setting up a WiFi extender from Rockspace. With the aid of this straightforward tutorial, you can quickly and effectively set up your extender and take advantage of a strong and stable Wi-Fi connection in the selected region.
Make sure your extender is ready, that you have chosen an appropriate location, and that you are connected to the extender’s network before moving on to the setup page. Go to the troubleshooting section or get help from Rockspace support if anything goes wrong during setup.
You may have a strong and reliable Wi-Fi connection anywhere in your house or workplace by following these instructions and appropriately configuring your Rockspace WiFi extender setup.
Read Also : Outsourcing Your IT: A Strategic Move to Outsmart Your Competitors


